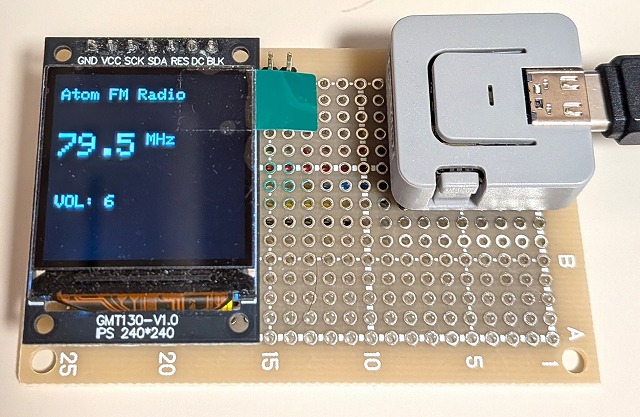
久しぶりに Atom Lite を引っ張り出してきました。これでFMラジオを作ればと AI にコードを作ってもらい表示テストしてみました。
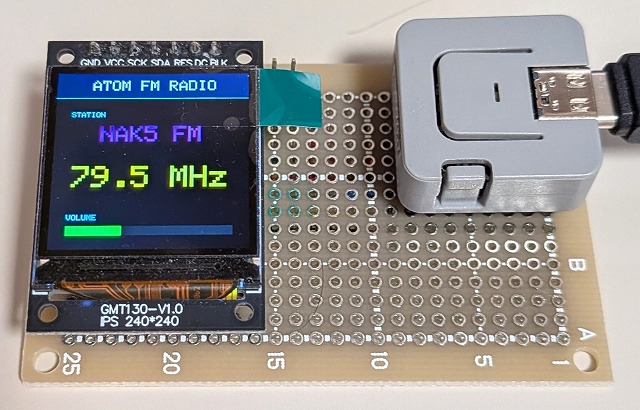
基本的な表示でコードができAtomのボタンで選局・音量調整が出来る仕様です。これでもいいのですが見栄えをよくしてとお願いすると見た目もよくなりました。
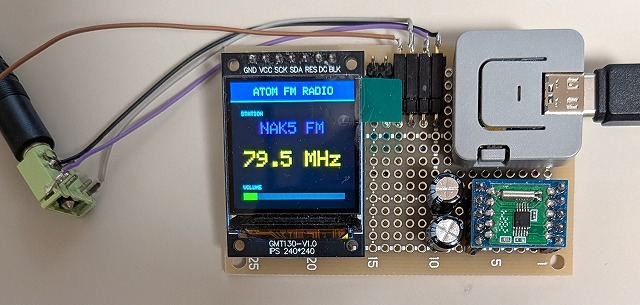
RD5708M を取り付け Atom Lite でFMラジオ を組み立ててみました。
// プリセット選局リスト
RadioStation stations[] = {
  {7950, "NAK5 FM"},
  {8000, "TOKYO FM"},
  {8130, "J-WAVE"},
  {8250, "NHK-FM"},
  {8970, "InterFM"},
  {9050, "TBS Radio"},
  {9160, "JOQR (AM)"}, // 文化放送
  {9300, "LF (AM)"}     // ニッポン放送
で Atom Lite のボタンで選局そして長押しで音量調整となかなか使い勝手もよく面白いFMラジオが出来ました。
Arduino のコード
#include <Arduino.h>
#include <Wire.h>
#include <Adafruit_GFX.h>
#include <Arduino_ST7789.h>
#include <SPI.h>
#include <RDA5807.h>

// --- ピン配置設定 (Atom Lite) ---
#define TFT_DC    22
#define TFT_RST   33
#define TFT_MOSI  19
#define TFT_SCLK  23
#define ATOM_BTN  39  // Atom Lite 本体ボタン

// I2Cピン(RDA5807用)
#define I2C_SDA   25
#define I2C_SCL   21

// --- 色の定義 (16ビットカラー) ---
#define COLOR_BG      0x0000 // 黒
#define COLOR_HEADER  0x012F // 深い紺
#define COLOR_TEXT    0xFFFF // 白
#define COLOR_ACCENT  0x07FF // シアン (水色)
#define COLOR_FREQ    0xFFE0 // 黄色
#define COLOR_CH_NAME 0xF81F // マゼンタ (ピンク)
#define COLOR_VOL     0x07E0 // 緑色
#define COLOR_BAR_BG  0x2104 // 暗いグレー (バーの背景)

Arduino_ST7789 tft = Arduino_ST7789(TFT_DC, TFT_RST, TFT_MOSI, TFT_SCLK);
RDA5807 radio;

// --- ラジオチャンネル構造体の定義 ---
struct RadioStation {
  uint16_t frequency; // 100倍した整数値 (例: 80.0MHz -> 8000)
  const char* name;   // 画面に表示する放送局名
};

// プリセット選局リスト
RadioStation stations[] = {
  {7950, "NAK5 FM"},
  {8000, "TOKYO FM"},
  {8130, "J-WAVE"},
  {8250, "NHK-FM"},
  {8970, "InterFM"},
  {9050, "TBS Radio"},
  {9160, "JOQR (AM)"}, // 文化放送
  {9300, "LF (AM)"}     // ニッポン放送
};
const int num_stations = sizeof(stations) / sizeof(stations[0]);
int current_station_idx = 0;

// 音量設定 (0 - 15)
int volume_levels[] = {2, 5, 8, 11, 14};
const int num_volumes = sizeof(volume_levels) / sizeof(volume_levels[0]);
int current_vol_idx = 0; // 初期音量:5
int vol_direction = 1;   // 音量の変化方向 (1: アップ, -1: ダウン)

// ボタン管理用変数
unsigned long btn_press_time = 0;
bool btn_active = false;
bool long_pressed_handled = false;       // 長押しが既に処理されたかどうかのフラグ
const unsigned long LONG_PRESS_MS = 600; // 長押しの判定時間

// 画面更新関数
void updateDisplay() {
  // 画面全体をクリア
  tft.fillScreen(COLOR_BG);

  // 1. ヘッダーエリア
  tft.fillRect(0, 0, 240, 35, COLOR_HEADER);
  tft.drawFastHLine(0, 35, 240, COLOR_ACCENT); // 区切り線

  tft.setTextColor(COLOR_TEXT);
  tft.setTextSize(2);
  tft.setCursor(45, 10);
  tft.print("ATOM FM RADIO");

  // 2. チャンネル名表示エリア(中央寄せ)
  tft.setTextColor(COLOR_ACCENT);
  tft.setTextSize(1);
  tft.setCursor(20, 55);
  tft.print("STATION");

  tft.setTextSize(3); // サイズ3 (1文字の幅は 6×3 = 18ピクセル)
  tft.setTextColor(COLOR_CH_NAME);

  const char* name = stations[current_station_idx].name;
  int name_width = strlen(name) * 18;
  int name_x = (240 - name_width) / 2; // 中央位置を計算

  tft.setCursor(name_x, 75);
  tft.print(name);

  // 3. 周波数表示エリア(中央寄せ)
  tft.setTextSize(4); // サイズ4 (1文字の幅は 6×4 = 24ピクセル)
  tft.setTextColor(COLOR_FREQ);

  // 周波数を文字列に変換して幅を計算 (例: "80.0 MHz")
  char freq_str[16];
  float freq_mhz = stations[current_station_idx].frequency / 100.0;
  snprintf(freq_str, sizeof(freq_str), "%.1f MHz", freq_mhz);

  int freq_width = strlen(freq_str) * 24;
  int freq_x = (240 - freq_width) / 2; // 中央位置を計算

  tft.setCursor(freq_x, 130);
  tft.print(freq_str);

  // 4. 音量表示エリア (下部)
  tft.setTextSize(1);
  tft.setTextColor(COLOR_ACCENT);
  tft.setCursor(20, 195);
  tft.print("VOLUME");

  // 音量バーの描画 (中央寄せ)
  int bar_width = 200;
  int bar_height = 12;
  int bar_x = (240 - bar_width) / 2; // (240 - 200) / 2 = 20
  int bar_y = 210;

  // バーの背景
  tft.fillRect(bar_x, bar_y, bar_width, bar_height, COLOR_BAR_BG);

  // 現在の音量に応じたインジケーターの幅 (最大音量15を基準に計算)
  int current_vol = volume_levels[current_vol_idx];
  int fill_width = (bar_width * current_vol) / 15;

  tft.fillRect(bar_x, bar_y, fill_width, bar_height, COLOR_VOL);
}

// ラジオの設定変更をモジュールに適用する関数
void applyRadioSettings() {
  radio.setFrequency(stations[current_station_idx].frequency);
  radio.setVolume(volume_levels[current_vol_idx]);
}

void setup() {
  Serial.begin(115200);

  // ボタンピンの設定(Atom Liteの本体ボタンはプルアップが必要)
  pinMode(ATOM_BTN, INPUT_PULLUP);

  // I2Cの初期化 (RDA5807用)
  Wire.begin(I2C_SDA, I2C_SCL);

  // ディスプレイの初期化
  tft.init(240, 240);
  tft.setRotation(2); // 画面の向きを調整

  // ラジオモジュールの初期化
  radio.setup();
  radio.setMono(false);
  radio.setBass(true); // 前回のコンパイルエラー対策で修正
  radio.setMute(false);
  radio.setBand(1); // 1 = WORLD/JAPAN (76-108MHz)
  radio.setSoftmute(true);

  // 初回設定の適用と画面描画
  applyRadioSettings();
  updateDisplay();
}

void loop() {
  // ボタンの状態を読み込み (押されるとLOW)
  bool btn_state = (digitalRead(ATOM_BTN) == LOW);

  if (btn_state && !btn_active) {
    // ボタンが押された瞬間
    btn_active = true;
    btn_press_time = millis();
    long_pressed_handled = false;
  }
  else if (btn_state && btn_active) {
    // ボタンが押され続けている状態(長押し判定)
    if (!long_pressed_handled && (millis() - btn_press_time >= LONG_PRESS_MS)) {
      // 【長押し時の処理】音量を変更(往復ロジック)
      current_vol_idx += vol_direction;

      // 上限に達したら次回から下げる、下限に達したら次回から上げる
      if (current_vol_idx >= num_volumes - 1) {
        current_vol_idx = num_volumes - 1;
        vol_direction = -1; // 反転してダウン方向へ
      } else if (current_vol_idx <= 0) {
        current_vol_idx = 0;
        vol_direction = 1;  // 反転してアップ方向へ
      }

      applyRadioSettings();
      updateDisplay();
      long_pressed_handled = true; // 連続実行防止
    }
  }
  else if (!btn_state && btn_active) {
    // ボタンが離された瞬間
    if (!long_pressed_handled) {
      // 【短押し時の処理】チャンネルを変更
      current_station_idx = (current_station_idx + 1) % num_stations;
      applyRadioSettings();
      updateDisplay();
    }
    btn_active = false;
  }

  delay(20); // チャタリング防止用の短いウェイト
}
コメント