XIAO ESP32C3 TFT_eSPI の表示テストをしましたが、ST7735 には上手く表示出来ましたが ILI9341 にはどうしても表示できません。
気分を変えて円形の液晶ディスプレイ GC9A01 を買い試してみました。
TFT_eSPI.h の User_Setup を GC9A01 に変更
// See SetupX_Template.h for all options available
#define USER_SETUP_ID 46
#define GC9A01_DRIVER

#define TFT_MISO  9
#define TFT_MOSI 10
#define TFT_SCLK  8
#define TFT_CS    2  // Chip select control pin
#define TFT_DC    3  // Data Command control pin
#define TFT_RST   4  // Reset pin (could connect to RST pin)
//#define TFT_RST  -1  // Set TFT_RST to -1 if display RESET is connected to ESP32 board RST

#define LOAD_GLCD   // Font 1. Original Adafruit 8 pixel font needs ~1820 bytes in FLASH
#define LOAD_FONT2  // Font 2. Small 16 pixel high font, needs ~3534 bytes in FLASH, 96 characters
#define LOAD_FONT4  // Font 4. Medium 26 pixel high font, needs ~5848 bytes in FLASH, 96 characters
#define LOAD_FONT6  // Font 6. Large 48 pixel font, needs ~2666 bytes in FLASH, only characters 1234567890:-.apm
#define LOAD_FONT7  // Font 7. 7 segment 48 pixel font, needs ~2438 bytes in FLASH, only characters 1234567890:.
#define LOAD_FONT8  // Font 8. Large 75 pixel font needs ~3256 bytes in FLASH, only characters 1234567890:-.
#define LOAD_GFXFF  // FreeFonts. Include access to the 48 Adafruit_GFX free fonts FF1 to FF48 and custom fonts

#define SMOOTH_FONT

#define SPI_FREQUENCY  40000000
#define SPI_READ_FREQUENCY  20000000

//#define SPI_TOUCH_FREQUENCY  2500000

// #define SUPPORT_TRANSACTIONS
自分でプログラムは作れませんのでブラウザーで検索し AIモード で時計を作ってもらいました。
#include <WiFi.h>
#include <NTPClient.h>
#include <WiFiUdp.h>
#include <TFT_eSPI.h>
#include <SPI.h>

// Wi-Fi設定
const char* ssid     = "***********";
const char* password = "**********";

// NTP設定 (JST = +9時間 = 32400秒)
WiFiUDP ntpUDP;
NTPClient timeClient(ntpUDP, "ntp.nict.jp", 32400, 60000);

TFT_eSPI tft = TFT_eSPI();
TFT_eSprite img = TFT_eSprite(&tft);
const int cX = 120; // 画面の中心X
const int cY = 120; // 画面の中心Y

// 曜日の文字列配列
const char* daysOfWeek[] = {"SUN", "MON", "TUE", "WED", "THU", "FRI", "SAT"};
void setup() {
  Serial.begin(115200);
  tft.init();
  tft.setRotation(0);
  img.createSprite(240, 240);

  // Wi-Fi接続
  WiFi.begin(ssid, password);
  while (WiFi.status() != WL_CONNECTED) {
    delay(500);
    Serial.print(".");
  }
  timeClient.begin();
}

void loop() {
  timeClient.update();
  int hours   = timeClient.getHours();
  int minutes = timeClient.getMinutes();
  int seconds = timeClient.getSeconds();

  // 日付・曜日の計算用
  unsigned long epochTime = timeClient.getEpochTime();
  time_t rawTime = (time_t)epochTime;
  struct tm *ti = localtime(&rawTime);
  int month   = ti->tm_mon + 1;
  int day     = ti->tm_mday;
  int weekDay = timeClient.getDay(); // 0:日, 1:月 ... 6:土

  // 1. 背景クリア
  img.fillSprite(TFT_BLACK);

  // 2. 時計の外枠・目盛り
  img.drawCircle(cX, cY, 118, TFT_MAGENTA);
  img.drawCircle(cX, cY, 115, TFT_DARKCYAN);
  for (int i = 0; i < 12; i++) {
    float angle = i * 30 * DEG_TO_RAD;
    int x1 = cX + cos(angle) * 108;
    int y1 = cY + sin(angle) * 108;
    int x2 = cX + cos(angle) * 115;
    int y2 = cY + sin(angle) * 115;
    img.drawLine(x1, y1, x2, y2, TFT_YELLOW);
  }

  // 3. 1〜12の数字を描画
  img.setTextDatum(MC_DATUM);
  img.setTextSize(2);
  for (int i = 1; i <= 12; i++) {
    float angle = (i * 30) * DEG_TO_RAD - HALF_PI;
    int nX = cX + cos(angle) * 88;
    int nY = cY + sin(angle) * 88;
    if (i % 3 == 0) {
      img.setTextColor(TFT_ORANGE, TFT_BLACK);
    } else {
      img.setTextColor(TFT_WHITE, TFT_BLACK);
    }
    img.drawNumber(i, nX, nY);
  }

  // ★追加:日付と曜日の表示 (文字盤の下側、Y=165の位置)
  char dateBuffer[16];
  sprintf(dateBuffer, "%02d/%02d %s", month, day, daysOfWeek[weekDay]);
  img.setTextSize(2);

  // 土曜日は青、日曜日は赤、平日は緑で表示してさらにカラフルに
  if (weekDay == 0) {
    img.setTextColor(TFT_RED, TFT_BLACK);
  } else if (weekDay == 6) {
    img.setTextColor(TFT_BLUE, TFT_BLACK);
  } else {
    img.setTextColor(TFT_GREEN, TFT_BLACK);
  }
  img.drawString(dateBuffer, cX, 165);

  // 4. 各「針」の角度計算
  float sAngle = (seconds * 6) * DEG_TO_RAD - HALF_PI;
  float mAngle = (minutes * 6 + seconds * 0.1) * DEG_TO_RAD - HALF_PI;
  float hAngle = (hours * 30 + minutes * 0.5) * DEG_TO_RAD - HALF_PI;

  // 5. カラフルな針の描画

  // 時針:太い青(長さ50)
  int hx = cX + cos(hAngle) * 50;
  int hy = cY + sin(hAngle) * 50;
  img.drawLine(cX, cY, hx, hy, TFT_SKYBLUE);
  img.drawLine(cX+1, cY+1, hx, hy, TFT_SKYBLUE);

  // 分針:緑(長さ72)
  int mx = cX + cos(mAngle) * 72;
  int my = cY + sin(mAngle) * 72;
  img.drawLine(cX, cY, mx, my, TFT_GREEN);

  // 秒針:鮮やかな赤(長さ82)
  int sx = cX + cos(sAngle) * 82;
  int sy = cY + sin(sAngle) * 82;
  img.drawLine(cX, cY, sx, sy, TFT_RED);

  // 6. 中心点のピン
  img.fillCircle(cX, cY, 5, TFT_YELLOW);

  // 7. 画面へ一括描画
  img.pushSprite(0, 0);
  delay(200);
}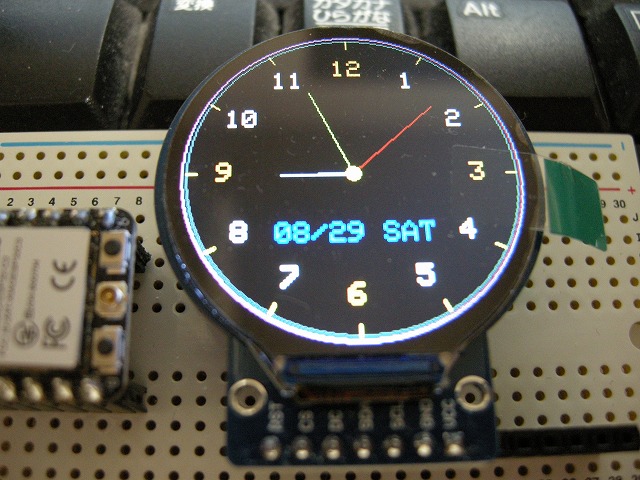
AIモードのおかげでまんまる時計が出来上がりました。

コメント